OneDrive and SharePoint Online File Deduplication Report | Microsoft Graph API

As an Office 365 admin, should you dedupe files on your SharePoint sites? In the normal case, I think the answer is no. As a general rule, it is cheaper to simply buy more capacity than it is to spend the time rationalizing through other people’s data. But, what if you’ve got a site that you know to be a mess, or maybe you just want to be tidy with your own OneDrive folder?

The second case is why I whipped this up. Over the years, I’ve worked on files that I’ve renamed or or copied into different folder structures, making a mess for myself. I wanted to dedupe them (using PowerShell of course!) but I’m using OneDrive’s Known Folder Move, which means most of the contents in Documents, Pictures, and Desktop are not sitting on my hard drive until I access them.

Let’s quickly talk about how you’d normally dedupe content at the file level, which is different than techniques that dedupe content at the storage (e.g. block) level, which we wouldn’t have access to anyway.

  1. Define the scope of your work. I suggest starting with just the contents of one directory, like your Documents folder. Besides, it would likely cause your users confusion to remove a file from SiteA because you found a copy of the file in SiteB.
  2. Normally this is where you start grouping files by size (called length in PowerShell). Two files cannot be identical if they are different sizes, so it would be a waste of time to hash them. However, in the case of SharePoint Online (including OneDrive), Microsoft has already hashed each file, so we can skip this step.
    • Note: Multiple files with the same name are not necessarily duplicates, so we won’t be evaluating names.
  3. Because Microsoft has already populated the quickXorHash property, we do not need to compute the hash of the files ourselves.
    • As mentioned in the remarks section on the previous link, this attribute is not available in all cases, however I’ve found it to be present in OneDrive for Business and SharePoint Online. We should err on the side of caution anyway, so we’ll just skip files without this attribute.
  4. Group files by the quickXorHash property, and report any group that has more than 1 member (where two or more files are the same).
  5. Generate a report.

The next step would be to decide which instances of a file you want, and then delete the others, but there is a lot to think about before you take that leap. Too much for this article, which will leave you with just the report. Once you’ve figured out which files to remove, it would be simple enough to send the results to Remove-MgDriveItem.

I use the Microsoft Graph PowerShell SDK’s Invoke-MgGraphRequest for all of the API work. If you are just interacting with your own files, you can jump right in. If you want to work on files on other sites, such as the OneDrive of another user account, you’ll want to register a app in your tenant with the Files.ReadWrite permission.

Quick rant: Why use Invoke-MgGraphRequest instead of the Get-MgDrive* cmdlets?

  1. The various mg-whatever cmdlets have inconsistent levels of quality. Microsoft has said that these are machine-generated, and in this author’s opinion, that’s why they often don’t work correctly. I’ve felt this way for a few years now, so maybe the quality has improved.
  2. The cmdlets don’t expose all of the functionality that may be available in the underlying API, or constrain the use of some functionality.
  3. They obfuscate what’s going on behind the scenes (though I love the -debug parameter). You learn a lot more about how M365 works by learning the real API.
  4. Often a cmdlet is more complicated than just using the API directly.
  5. There are so many modules to install!

Quick caveat: So why use Invoke-MgGraphRequest instead of simply Invoke-RestMethod or Invoke-WebRequest like a true purist?

  1. It does a nice job of handling authentication in the background, so I don’t have to keep track of tokens.
  2. The app is already registered by Microsoft:

Back to the dedupe report…

We’ll create a folder on your desktop, and assume it is synced to your OneDrive in the normal manner, as mentioned above with the Known Folder Move feature.

# Create some duplicate files
$Desktop = [Environment]::GetFolderPath("Desktop")
$TestDir = mkdir $Desktop\DupesDirectory -Force
$TestLogFile = (Invoke-WebRequest "https://gist.githubusercontent.com/Mike-Crowley/d4275d6abd78ad8d19a6f1bcf9671ec4/raw/66fe537cfe8e58b1a5eb1c1336c4fdf6a9f05145/log.log.log").content
1..25 | ForEach-Object { $TestLogFile | Out-File "$TestDir\$(Get-Random).log" }

# Create some non-duplicate files
1..25 | ForEach-Object { Get-Random | Out-File "$TestDir\$(Get-Random).log" }

You should now have a DupesDirectory folder. Half of the files are duplicates:

Wait for it to sync to OneDrive before moving on:

In this case, we could use the /me/drive uri, but since we’re building a tool for admins, not an app for end-users, we’ll specify the user in the request, even if that is “me” in today’s demo. This lets us use it for other users and incorporate foreach loops in the future.

(Invoke-MgGraphRequest -Uri 'v1.0/me/drive').value.webUrl

vs

$Upn = "mike@mikecrowley.fake"
(Invoke-MgGraphRequest -Uri "v1.0/users/$Upn/drive").value.webUrl 

Also in this case, we know the folder path to check. It’s ...Documents/DupesDirectory. Let’s use that for now, but I’ll share some thoughts on running this across multiple folders or sites in a little bit. To list the new files, run the below:

Connect-MgGraph -NoWelcome
$Upn = "mike@mikecrowley.fake"
$Drive = Invoke-MgGraphRequest -Uri "beta/users/$($upn)/drive"
$DriveChildren = Invoke-MgGraphRequest -Uri "beta/drives/$($Drive.id)/root:/Desktop/DupesDirectory:/children"
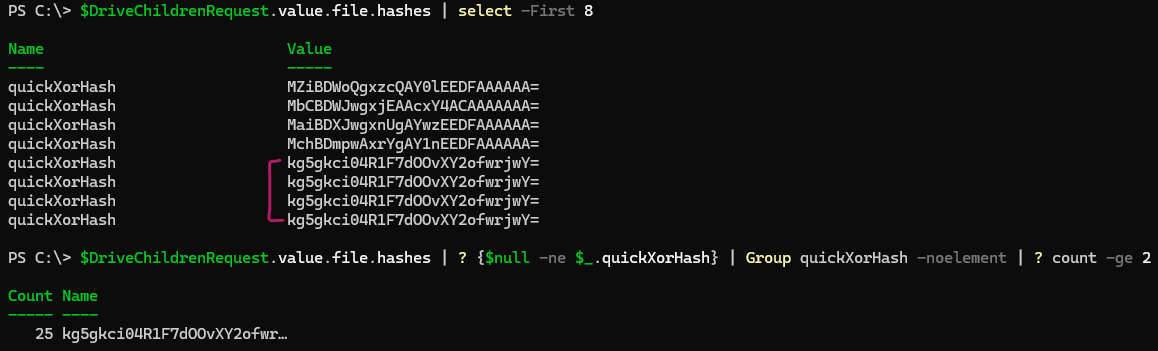
$DriveChildren.value.name

This should list your new files:

Notice how the files have an quickXorHash attribute:

Hmm, do you see what I see? Duplicates!

Note: Microsoft limits the output to 200 objects by default, which is fine for our test, but I’ve included code to loop through additional pages, should you have more files in the future.

# Add a couple of extra duplicate groups to make the report interesting:

1..25 | ForEach-Object { "Hello World 1" | Out-File "$TestDir\$(Get-Random).log" }
1..25 | ForEach-Object { "Hello World 2" | Out-File "$TestDir\$(Get-Random).log" }

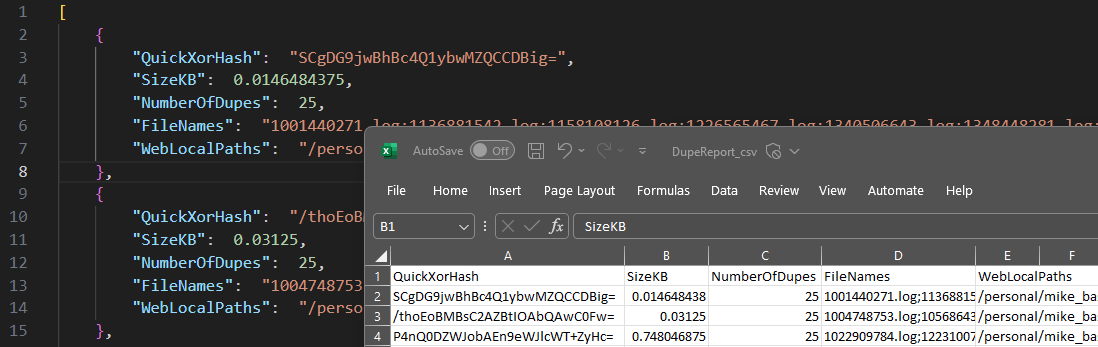
The script will place two files on your desktop. One in CSV the other in JSON, which I find to be an easier format for evaluating the duplicate file groups.

Here is the complete code:

<Code updated below>

Some thoughts on searching multiple folders, document libraries, or sites:

Want to search all files on your OneDrive, not just one level of the DupesDirectory folder? It will take more work. First, swap out this line:

$uri = "beta/drives/$($drive.id)/root:/Desktop/DupesDirectory:/children"

With this instead:

$uri = "beta/users/$($upn)/drive/root/search(q='')" 

Be warned – it may take a long time. It also depends on Microsoft’s search index, which may be slower or incomplete, making testing in quick succession unreliable. I got tens of thousands of files returned for my OneDrive, so that felt substantial enough. Unfortunately, and here is the bummer, this does not populate the hashes property. That means you’d need to feed it back in to another call, getting the file explicitly. I will update this post if I find a better solution.

You may want to check for duplicate files across more than just a single drive. In this case, you’ll need to modify the script to include multiple queries (for each site), combining the results into a single array. Otherwise the logic would be the same.

My goal with this article was to introduce the quickXorHash property and show how it can be useful with a dedupe report. If you have more questions about navigating SharePoint or OneDrive through Graph, leave questions in the comments.

EDIT: 23 April 2024: Here is a draft of a better version. Once testing is complete, I will update this article to use this file, which handles recursion, page size and other features.

https://github.com/Mike-Crowley/Public-Scripts/blob/main/Find-DriveItemDuplicates.ps1

Resetting Azure AD User Passwords with Microsoft Graph PowerShell

Not many things in IT easier than resetting a user’s password, right? Well, I found the Graph SDK PowerShell module’s Reset-MgUserAuthenticationMethodPassword to be pretty unintuitive. But as with many things, it’s not hard to use once you have an example. I couldn’t find one online, including the usual places (the “example” tab on the resetpassword api article & the cmdlet article), so here ya go:

Connect-MgGraph
Select-MgProfile -Name beta
$user = user1@example.com
$method = Get-MgUserAuthenticationPasswordMethod -UserId $user
  
Reset-MgUserAuthenticationMethodPassword -UserId $user -RequireChangeOnNextSignIn -AuthenticationMethodId $method.id -NewPassword "zQ7!Ra3MM6ha" 

But why use this cmdlet anyway?

Well, in addition to all the reasons tied to the deprecation of Azure AD Graph, and the potential demise of the msonline & azuread PowerShell modules, Microsoft’s Graph beta API currently stands on a short list of places to reset a password and have it also write back to the on-premises Active Directory.

Supported administrator operations

  • Any administrator self-service voluntary change password operation.
  • Any administrator self-service force change password operation, for example, password expiration.
  • Any administrator self-service password reset that originates from the password reset portal.
  • Any administrator-initiated end-user password reset from the Azure portal.
  • Any administrator-initiated end-user password reset from the Microsoft Graph API.

Using this API is especially handy if you have a multi-domain hybrid environment, where connecting to the requisite domain controllers is obnoxious, or in scenarios when you don’t have connectivity to the on-premises Active Directory in the first place.

What is an AuthenticationMethodId?

As you can see in the above code, we use Get-MgUserAuthenticationPasswordMethod to first learn the correct “AuthenticationMethodId”. These are Microsoft’s way to define the various types of authentication you can use with Azure AD, including FIDO2 keys, passwords, the Authenticator app, etc.

(Image source: https://docs.microsoft.com/en-us/azure/active-directory/authentication/concept-authentication-methods)

As of this writing, there are 9 methods to choose from. When resetting a password, you want passwordAuthenticationMethod, which returns a well-known GUID of 28c10230-6103-485e-b985-444c60001490. In fact, this means you may not need to use Get-MgUserAuthenticationPasswordMethod, making this approach faster:

Reset-MgUserAuthenticationMethodPassword -UserId $user -RequireChangeOnNextSignIn -AuthenticationMethodId "28c10230-6103-485e-b985-444c60001490" -NewPassword "zQ7!Ra3MM6ha"

Arguably, a cmdlet whose sole purpose is to reset passwords should have this baked in already, but I suppose the current implementation allows for future scalability.

Azure AD Sign-In Activity Report (Via Get-MgUser)

Another post on the Azure SDK cmdlet module, this time regarding the new SignInActivity attribute.

I am regularly being asked by customers to identify inactive Office 365 accounts. I’m well past the: “lol, you’re saying you don’t know who works here?” part of this problem and just follow up with a discussion on the criteria for “inactive”. The most in-depth analysis include looking at Exchange, Teams, and SharePoint usage, but I’m finding this new beta API attribute to be real handy.

Question-1: What is SignInActivity?

Answer-1: It’s an attribute exposed through the the Microsoft Graph Beta API (not Get-Msoluser or Get-AzureADUser). The How to detect inactive user accounts topic states it as such:

You detect inactive accounts by evaluating the lastSignInDateTime property exposed by the signInActivity resource type of the Microsoft Graph API. The lastSignInDateTime property shows the last time a user made a successful interactive sign-in to Azure AD.

Question-2: Ok, super, how do I use it with PowerShell?

Answer-2a: Graph of course! Here is a script that I wrote that worked for me:

https://github.com/Mike-Crowley/Public-Scripts/blob/main/Graph_SignInActivity_Report.ps1

Answer-2b: If you aren’t comfortable working with Microsoft Graph directly, or if you just don’t want the hassle, you can also use the Get-MgUser cmdlet from the aforementioned SDK module.

In either case, you’ll need to decide if you’re going to run this against the built-in app: “Microsoft Graph PowerShell” (simpler), or if you want to run it as an custom app registration (less simple, but better for automation). Once you’ve made that decision, assign the permissions.

If you’re using a custom app, use the Azure portal and search the Microsoft Graph API permissions list for:

  • AuditLog.Read.All
  • Organization.Read.All

If you’re using the Get-MgUser cmdlet, you can add these ‘scopes’ with -Scopes parameter of Connect-MgGraph.

Connect-MgGraph -Scopes AuditLog.Read.All, Organization.Read.All

In both of theses cases (app & delegated), you should be prompted once, and depending on how your tenant is configured, your administrator (you?) will need to give consent to the permissions.

NOTE: You don’t need to use the -scopes parameter each time you connect. This parameter is to prompt the permission consent page, which, once approved, is then recorded with the app.

After you’ve connected to Graph, using Connect-MgGraph, you’ll need to switch to the ‘beta’ API. The SignInActivity attribute isn’t exposed to the v1.0 API yet.

Select-MgProfile beta

From here, you can start using PowerShell like you’re used to. One thing to note when pulling the SignInActivity attribute is that you must use the user’s Azure AD GUID for the -UserId parameter, even if normally UPN would have sufficed. For example:

Get-MgUser -UserId 3a927ed7-d581-40ff-96a0-f5185014f0bf -Property SignInActivity | Select-Object -ExpandProperty SignInActivity | Format-List *


LastSignInDateTime   : 10/28/2021 12:10:41 AM
LastSignInRequestId  : c344b3c5-02fc-4fb4-b46f-7fe1624f5e91
AdditionalProperties : {[lastNonInteractiveSignInDateTime, 2021-10-28T02:02:41Z], [lastNonInteractiveSignInRequestId, 5ffc8a91-85b5-421c-8201-75e9fa40797d]}

Here is a more involved example, that demonstrates SignInActivity put together with some Exchange Online attributes (as I said, I am trying to find inactive users, and these additional fields can be helpful). It will create an Excel (.xlsx) file with the following column headers:

UserPrincipalName, CreatedDateTime, DisplayName, Mail, OnPremisesImmutableId, OnPremisesDistinguishedName, OnPremisesLastSyncDateTime, SignInSessionsValidFromDateTime, RefreshTokensValidFromDateTime, Id, PrimarySmtpAddress, ExternalEmailAddress, LastSignInDateTime, lastNonInteractiveSignInDateTime

Before you run the script, you’ll need to install the following modules:

Install-Module ExchangeOnlineManagement
Install-Module ImportExcel
Install-Module Microsoft.Graph.Authentication
Install-Module Microsoft.Graph.Users

Finally, the script itself:

Connect-ExchangeOnline -UserPrincipalName <user>
Connect-MgGraph -TenantId <tenant>
Select-MgProfile beta

$MailUsers = Get-User -filter {recipienttypedetails -eq 'MailUser'} -ResultSize unlimited
$ReportUsers = $MailUsers | ForEach-Object {
    $MailUser = $_   
    
    $Counter ++
    $percentComplete = (($Counter / $MailUsers.count) * 100)
    Write-Progress -Activity "Getting MG Objects" -PercentComplete $percentComplete -Status "$percentComplete% Complete:"    
       
       #to do - organize properties better
    Get-MgUser -UserId $MailUser.ExternalDirectoryObjectId -ConsistencyLevel eventual -Property @(
        'UserPrincipalName'
        'SignInActivity'
        'CreatedDateTime'        
        'DisplayName'
        'Mail'
        'OnPremisesImmutableId'
        'OnPremisesDistinguishedName'
        'OnPremisesLastSyncDateTime'
        'SignInSessionsValidFromDateTime'
        'RefreshTokensValidFromDateTime'
        'id'
    ) | Select-Object @(
        'UserPrincipalName'        
        'CreatedDateTime'        
        'DisplayName'
        'Mail'
        'OnPremisesImmutableId'
        'OnPremisesDistinguishedName'
        'OnPremisesLastSyncDateTime'
        'SignInSessionsValidFromDateTime'
        'RefreshTokensValidFromDateTime'
        'id'        
        @{n='PrimarySmtpAddress'; e={$MailUser.PrimarySmtpAddress}}
        @{n='ExternalEmailAddress'; e={$MailUser.ExternalEmailAddress}}
        @{n='LastSignInDateTime'; e={[datetime]$_.SignInActivity.LastSignInDateTime}}
        @{n='lastNonInteractiveSignInDateTime'; e={[datetime]$_.SignInActivity.AdditionalProperties.lastNonInteractiveSignInDateTime}}           
    )
}

$Common_ExportExcelParams = @{
    # PassThru     = $true
    BoldTopRow   = $true
    AutoSize     = $true
    AutoFilter   = $true
    FreezeTopRow = $true
}

$FileDate = Get-Date -Format yyyyMMddTHHmmss

$ReportUsers | Sort-Object UserPrincipalName | Export-Excel @Common_ExportExcelParams -Path ("c:\tmp\" + $filedate + "_report.xlsx") -WorksheetName report

NOTE: Future updates to this script will be on GitHub:

https://github.com/Mike-Crowley/Public-Scripts/blob/main/MailUser-MgUser-Activity-Report.ps1

Sending Email with Send-MgUserMail (Microsoft Graph PowerShell)

As a follow-on post to the Send-MgUserMessage article, I’d like to discuss Send-MgUserMail.

  • What is this cmdlet?
  • How is Send-MgUserMail different from Send-MgUserMessage?
  • Did I waste a whole bunch of time with the other cmdlet and article only to find a better approach?

To answer the last question first: “The Time You Enjoy Wasting Is Not Wasted Time” 😊

At first glance, it’s silly that there are two brand new cmdlets that basically do the same thing. Though when you look at the underlying Graph namespaces they interact with, you’ll realize this is Graph’s fault for publishing two namespaces! The SDK cmdlet module is just trying to make Graph easier, so we can’t really blame PowerShell.

Send-MgUserMailSend-MgUserMessage
• Uses the Graph sendmail namespace

• Can send an email in a single step

• Requires Mail.Send permission
• Uses the Graph send namespace

• Sends a previously created message

• Could send emails created by an outside process or user

• Can reply and forward messages in a mailbox

• Requires Mail.Send permission, though you’ll possibly be creating the message itself with New-MgUserMessage, which requires Mail.ReadWrite (arguably too much power in most cases)

As we begin to understand by the above table, Send-MgUserMail requires fewer permissions and requires fewer moving parts*, so I expect to be using that instead of Send-MgUserMessage in the future.

*You’re about to see, the “moving parts” may not actually be fewer, since its more complex to use Send-MgUserMail, but I’ve made some functions below that you are welcome to include in your projects to simplify some of the more complex data structures.

To get started, be sure you have the correct modules on your computer and that the app you are using has the correct permissions. In my case, I am using application-based authentication as I mentioned in the previous post. You could also use delegated permissions for this task.

Install the modules:

Install-Module Microsoft.Graph.Authentication
Install-Module Microsoft.Graph.Users.Actions

Next, assign your custom application (or the built-in “Microsoft Graph PowerShell” application) the sendmail permission. You can do this with the -Scopes parameter of Connect-MgGraph, or on the app directly, in the Azure AD Portal. I realize that this is a loaded statement, but Graph API permissions are a topic that is beyond the scope (heh) of this article.

If you need help, you can start with this article for guidance:

Determine required permission scopes

Once permissions are set, you can connect to Graph and start sending email. Unfortunately, Send-MgUserMail‘s main parameter -BodyParameter takes the following object type:

IPathsFh5OjtUsersUserIdMicrosoftGraphSendmailPostRequestbodyContentApplicationJsonSchema

No, I’m not joking. That’s what the documentation says! Needless to say, figuring out what this meant took some tinkering. In the end, it seems that these Mg* cmdlets love nested hash tables. I wrote a couple of functions to simplify the creation of two of them. the rest aren’t functions, but you can follow along to see the PowerShell interpretation of their structure.

This one takes a list ([array]) of email addresses and converts it into the IMicrosoftGraphRecipient object type:

Function ConvertTo-IMicrosoftGraphRecipient {
    [cmdletbinding()]
    Param(
        [array]$smtpAddresses        
    )
    foreach ($address in $smtpAddresses) {
        @{
            emailAddress = @{address = $address}
        }    
    }    
}

Note: Graph’s toRecipients property requires an array of hash tables, even if you have only one recipient. I’ve addressed this in the script with [array]$toRecipients, because I had trouble making the function output an array in all cases.

This next function uploads attachments, first by converting to Base64, and then nesting them in the IMicrosoftGraphAttachment format.

Function ConvertTo-IMicrosoftGraphAttachment {
    [cmdletbinding()]
    Param(
        [string]$UploadDirectory        
    )
    $DirectoryContents = Get-ChildItem $UploadDirectory -Attributes !Directory -Recurse
    foreach ($File in $DirectoryContents) {
        $EncodedAttachment = [convert]::ToBase64String((Get-Content $File.FullName -Encoding byte))
        @{
            "@odata.type"= "#microsoft.graph.fileAttachment"
            name = ($File.FullName -split '\\')[-1]
            contentBytes = $EncodedAttachment
        }   
    }    
}

As I mentioned on the last post, if your attachment size is above 3MB, you should check out this function written by Glen Scales:

Sending a Message with a Large attachment using the Microsoft Graph and Powershell

Finally, here is the script itself. Hopefully, if you’ve followed along thus far, the rest doesn’t require much interpretation.

<#
    Script for sending email with send-mgusermail
    
    Ref:

    https://mikecrowley.us/2021/10/27/sending-email-with-send-mgusermail-microsoft-graph-powershell
    https://docs.microsoft.com/en-us/graph/api/user-sendmail
    https://docs.microsoft.com/en-us/powershell/module/microsoft.graph.users.actions/send-mgusermail

#>

#region 1: Setup

    $emailRecipients   = @(
        'user1@domain.com'
        'user2@domain.biz'
    )
    $emailSender  = 'me@domain.info'

    $emailSubject = "Sample Email | " + (Get-Date -UFormat %e%b%Y)

    $MgConnectParams = @{
        ClientId              = '<your app>'
        TenantId              = '<your tenant id>'
        CertificateThumbprint = '<your thumbprint>'
    }

    Function ConvertTo-IMicrosoftGraphRecipient {
        [cmdletbinding()]
        Param(
            [array]$SmtpAddresses        
        )
        foreach ($address in $SmtpAddresses) {
            @{
                emailAddress = @{address = $address}
            }    
        }    
    }

    Function ConvertTo-IMicrosoftGraphAttachment {
        [cmdletbinding()]
        Param(
            [string]$UploadDirectory        
        )
        $directoryContents = Get-ChildItem $UploadDirectory -Attributes !Directory -Recurse
        foreach ($file in $directoryContents) {
            $encodedAttachment = [convert]::ToBase64String((Get-Content $file.FullName -Encoding byte))
            @{
                "@odata.type"= "#microsoft.graph.fileAttachment"
                name = ($File.FullName -split '\\')[-1]
                contentBytes = $encodedAttachment
            }   
        }    
    }

#endregion 1


#region 2: Run

    [array]$toRecipients = ConvertTo-IMicrosoftGraphRecipient -SmtpAddresses $emailRecipients 

    $attachments = ConvertTo-IMicrosoftGraphAttachment -UploadDirectory C:\tmp

    $emailBody  = @{
        ContentType = 'html'
        Content = Get-Content 'C:\tmp\HelloWorld.htm'    
    }

    Connect-Graph @MgConnectParams
    Select-MgProfile v1.0
    
    $body += @{subject      = $emailSubject}
    $body += @{toRecipients = $toRecipients}    
    $body += @{attachments  = $attachments}
    $body += @{body         = $emailBody}

    $bodyParameter += @{'message'         = $body}
    $bodyParameter += @{'saveToSentItems' = $false}

    Send-MgUserMail -UserId $emailSender -BodyParameter $bodyParameter

#endregion 2

Note: Future updates to this script will be on GitHub:

https://github.com/Mike-Crowley/Public-Scripts/blob/main/MgUserMail.ps1

Sample script to map additional fields to Universal Print attributes.

A quick [re]post to share how to work with the Universal Printing cmdlets:

Unfortunately, the Universal Print Connector doesn’t upload fields from the on-premises object, such as location and comments. Likely this is because “location” is now represented as over a dozen attributes in Azure.

At some point, someone should walk around to each printer and collect the info to populate the attributes properly, but it won’t be me and it won’t be today. 😊 For now, I chose to map the fields as follows, but you can obviously adjust this as necessary:

  • On-premises “Location” = cloud “Site”
  • On-premises “Comment” = cloud “Room Description”

There are innumerable ways to do this, but I like the join-object cmdlet, so be sure to install that first.

Install-Module UniversalPrintManagement
Install-Module join-object 

#Run from the print server:

$OnPremPrinters = Get-Printer 

Connect-UPService 

$CloudPrinters = Get-UPPrinter

$Merge = Join-Object -Left $OnPremPrinters -LeftJoinProperty Name -Right $CloudPrinters -RightJoinProperty name -Prefix Cloud_

foreach ($printer in $Merge) {
    Set-UPPrinterProperty -PrinterId $printer.Cloud_PrinterId -Site $printer.Location -RoomDescription $printer.Comment
}

Using Send-MgUserMessage to send Email (with Attachments)

EDIT 25Oct2021:

This article discusses Send-MgUserMessage, though I’ve since realized Send-MgUserMail might be a more efficient option in many cases.

EDIT 27Oct2021:

I have written a follow on-article for Send-MgUserMail. Check it out when you’re done with this one.

Original Post:

I’ve been incorporating the new “SDK” cmdlets into my work lately, and though I’m not entirely convinced using them is any easier than just working with Graph directly, I wanted to update an old script that used Send-Mailmessage, and managing tokens and HTTP headers felt like overkill. Speaking of Send-MailMessage, you may have noticed this harshly worded message on its help page:

Warning

The Send-MailMessage cmdlet is obsolete. This cmdlet does not guarantee secure connections to SMTP servers. While there is no immediate replacement available in PowerShell, we recommend you do not use Send-MailMessage. For more information, see Platform Compatibility note DE0005.

Send-MgUserMessage is arguably the most direct replacement (see 25Oct2021 edit), but it is more difficult to use, due to the fact we need to build several custom objects, whereas with Send-MailMessage, the parameters did the work for us.

In my scenario, I also wanted this task to run as an application, defined in Azure Active Directory, using application permissions – not delegated through my personal account. Additionally, I wanted to use a certificate to authenticate to Azure instead of managing a “client secret”. I’m choosing not to walk through those prerequisites here, because they are already well documented:

  1. Use app-only authentication with the Microsoft Graph PowerShell SDK
  2. Create a self-signed public certificate to authenticate your application

To get started, install the following PowerShell Modules. I should also point out that if you already have these installed, be sure to upgrade to the latest version (1.7.0 at time of writing), since there have been significant changes in how this cmdlet works.

Install-Module Microsoft.Graph.Authentication
Install-Module Microsoft.Graph.Mail
Install-Module Microsoft.Graph.Users.Actions

Once you’ve got those, you can start sending email. Here is a “simple” example that uses a HTML body, as well as uploads a small attachment (attachments above 3MB are more complicated). In the below example, I’m using a sample book1.xlsx file.

#requires -modules Microsoft.Graph.Authentication,Microsoft.Graph.Mail,Microsoft.Graph.Users

#connect with CBA
# https://docs.microsoft.com/en-us/graph/powershell/app-only?tabs=azure-portal
# https://docs.microsoft.com/en-us/azure/active-directory/develop/howto-create-self-signed-certificate

$ConnectParams = @{
    ClientId = '84af9676-<not real>4194bb6d9e3'
    TenantId = 'ef508849-9d0<not real>5d800549'
    CertificateThumbprint = '96546bf89<not real>67332c703e15123b07'
}
Connect-Graph @ConnectParams

#recipients
$EmailAddress  = @{address = 'user1@recipientDomain.com'} # https://docs.microsoft.com/en-us/graph/api/resources/recipient?view=graph-rest-1.0
$Recipient = @{EmailAddress = $EmailAddress}  # https://docs.microsoft.com/en-us/graph/api/resources/emailaddress?view=graph-rest-1.0

#Body
$body  = @{
    content = '<html>hello <b>world</b></html>'
    ContentType = 'html'
}

#Attachments
# If over ~3MB: https://docs.microsoft.com/en-us/graph/outlook-large-attachments?tabs=http
$AttachmentPath = 'C:\tmp\Book1.xlsx'
$EncodedAttachment = [convert]::ToBase64String((Get-Content $AttachmentPath -Encoding byte)) 
$Attachment = @{
    "@odata.type"= "#microsoft.graph.fileAttachment"
    name = ($AttachmentPath -split '\\')[-1]
    contentBytes = $EncodedAttachment
}

#Create Message (goes to drafts)
$Message = New-MgUserMessage -UserId me@mydomain.com -Body $body -ToRecipients $Recipient -Subject Subject1 -Attachments $Attachment

#Send Message
Send-MgUserMessage -UserId me@mydomain.com -MessageId $Message.Id
 

#end

Once you’re done, the message should look like this in the Sent Items folder of whoever you used to do the sending:

Querying msExchDelegateListLink in Exchange Online with PowerShell

9 Mar 2023 Update:

I updated the script to support Modern Auth (OAuth) which is now required for most things in Exchange Online. Details are in the comments of the new script itself:

https://github.com/Mike-Crowley/Public-Scripts/blob/main/Get-AlternateMailboxes.ps1

If you still want the old one, it will be here for a while

https://github.com/Mike-Crowley/Public-Scripts/blob/main/Get-AlternateMailboxes_BasicAuth.ps1

12 Aug 2020 Update:

A few readers contacted me to report this script no longer works. I got around to investigating it today and see the cause, revealed in a Fiddler trace:

X-AnchorMailbox

(larger)

It would seem Microsoft now needs an anchor mailbox, likely to determine what tenant this request is for. I was able to modify my script to accommodate. Sadly, Microsoft is decomissioning the TechNet Gallery, so I may not update that site, just to have them delete it anyway. Please consider including the following in the script yourself:

... 

#Other attributes available here: https://msdn.microsoft.com/en-us/library/microsoft.exchange.webservices.autodiscover.usersettingname(v=exchg.80).aspx
 
$Headers = @{
'X-AnchorMailbox' = $Credential.UserName
} 

$WebResponse = Invoke-WebRequest https://autodiscover-s.outlook.com/autodiscover/autodiscover.svc -Credential $Credential -Method Post -Body $AutoDiscoverRequest -ContentType 'text/xml; charset=utf-8' -Headers $Headers
[System.Xml.XmlDocument]$XMLResponse = $WebResponse.Content 

... 

$Credential= Get-Credential
Get-AlternateMailboxes -SMTPAddress bob.smith2@contoso.com -Credential $Credential

...

Original Post:


There are a number of articles that describe the relationship between the FullAccess permission of an Exchange mailbox and the msExchDelegateListLink attribute. Here are two good ones:

In short, this attribute lists all the other mailboxes your mailbox has FullAccess to, unless AutoMapping was set to $false when assigning the permission. It can be a handy attribute to query when trying to learn what mailboxes might appear in an end-user’s Outlook profile.

This attribute is synced to Office 365 via Azure AD Connect, however, for whatever reason, it is not synced back on-premises for new or migrated mailboxes. It is also not exposed in Get-User, Get-Mailbox, Get-MailboxStatistics, Microsoft Graph or Azure AD Graph.

The information is however included in the user’s AutoDiscover XML response. This is how Outlook knows what mailboxes to mount. If you want to look at this data manually, use the ctrl+right-click tool from the Outlook icon on the system tray. This article describes how to do that, if somehow you’re reading this but don’t already know about this tool:

You can also look at the AutoDiscover XML file via the venerable TestConnectivity.Microsoft.com web site. Look at the bottom of of the file, and you’ll see “AlternativeMailbox” entries.

<AlternativeMailbox>  
<Type>Delegate</Type>
<DisplayName>crowley test 1</DisplayName>
<SmtpAddress>crowleytest1@mikecrowley.us</SmtpAddress>
<OwnerSmtpAddress>crowleytest1@mikecrowley.us</OwnerSmtpAddress>
</AlternativeMailbox>
<AlternativeMailbox>
<Type>Delegate</Type>
<DisplayName>crowley test 2</DisplayName>
<SmtpAddress>crowleytest2@mikecrowley.us</SmtpAddress>
<OwnerSmtpAddress>crowleytest2@mikecrowley.us</OwnerSmtpAddress>
</AlternativeMailbox>

While not exactly the msExchDelegateListLink attribute, its the same difference.

This is neat, but to be useful at scale, we need to query this in PowerShell. Fortunately, there are two methods to fetch the AutoDiscover XML.

You can query these endpoints directly or through the the Exchange Web Services (EWS) API. If you don’t have a preference, Microsoft’s documentation recommends SOAP, which is the approach I’ll discuss here.

Using Invoke-WebRequest and SOAP, we can request specific attributes, such as AlternateMailboxes. Other useful attributes are listed in this article:

While I’m not a developer (developers, please keep your laughter to yourself!), I did manage to cobble together the following SOAP request, which will be the string we “post” to the AutoDiscover service. You’ll notice I’ve marked the user we’re querying and any attributes I might want in bold (modify this list to suit your needs):

<soap:Envelope xmlns:a="http://schemas.microsoft.com/exchange/2010/Autodiscover"
xmlns:wsa="http://www.w3.org/2005/08/addressing"
xmlns:xsi="http://www.w3.org/2001/XMLSchema-instance"
xmlns:soap="http://schemas.xmlsoap.org/soap/envelope/">
<soap:Header>
<a:RequestedServerVersion>Exchange2013</a:RequestedServerVersion>
<wsa:Action>http://schemas.microsoft.com/exchange/2010/Autodiscover/Autodiscover/GetUserSettings</wsa:Action>
<wsa:To>https://autodiscover.exchange.microsoft.com/autodiscover/autodiscover.svc</wsa:To>
</soap:Header>
<soap:Body>
<a:GetUserSettingsRequestMessage xmlns:a="http://schemas.microsoft.com/exchange/2010/Autodiscover">
<a:Request>
<a:Users>
<a:User>
<a:Mailbox>bob@contoso.com</a:Mailbox>
</a:User>
</a:Users>
<a:RequestedSettings>
<a:Setting>UserDisplayName</a:Setting>
<a:Setting>UserDN</a:Setting>
<a:Setting>UserDeploymentId</a:Setting>
<a:Setting>MailboxDN</a:Setting>
<a:Setting>AlternateMailboxes</a:Setting>
</a:RequestedSettings>
</a:Request>
</a:GetUserSettingsRequestMessage>
</soap:Body>
</soap:Envelope>

(For this post, I only care about AlternateMailboxes.)

AutoDiscover requires authentication, so we’ll also need to use the Get-Credential cmdlet. Interestingly, any mailbox can query the AutoDiscover response for any other user in the Office 365 tenant. This means, through PowerShell, I can look up the msExchDelegateListLink / AlternativeMailbox values for other users (even without administrative privileges).

I’ve written a function to return the results in a PowerShell array like this:

Get-AlternateMailboxes-Example

I should also point out:

  • It has the Exchange Online URL hard-coded within, though you could adapt this for other URLs if you’d like.
  • Both SMTPAddress and Credential parameters require valid Exchange Online mailboxes (though, as previously mentioned they do not need to be the same mailbox).

Usage Example:

Get-AlternateMailboxes -SMTPAddress bob@contoso.com -Credential (Get-Credential)

Finally, here is the script itself:

Azure AD Connect PowerShell Cmdlets

documentation

Click the image!

Microsoft TechNet used to be one of the best documentation libraries in the industry. Sadly, it still is; so what’s that tell you about the industry today?

Office 365 and Azure are truly great cloud services, but the frequency of updates and new releases are a challenge for Microsoft’s own sales team to keep up with, let alone us in the field, trying to work with the stuff. As made abundantly clear by their actions (e.g. killing tech conferences, technical writer layoffs, shuttering TechNet subscriptions, and abandoning the MCM program), Microsoft doesn’t really see “the problem”.

When Microsoft shipped DirSync and then later Azure AD Sync, documentation of the associated PowerShell modules became increasingly sparse, though some cmdlets did have a help synopsis, as I discussed last year. Azure AD Connect, the current version of Office 365 and Azure Active Directory synchronization technology, has 69 cmdlets in the “ADSync” module.

Wanna take a guess at how many of these have an associated help topic? Don’t forget, this product was launched earlier this summer and is now on it’s second public release.

Zero

(Pause for effect)

So, I have listed all 69 cmdlets here, with a brief note about what I’ve found so far. Right now, most are empty, but I will fill them in as I discover their purpose and/or have more time. If you’ve got a question about one I don’t have detailed, leave a comment and I’ll try to prioritize some research for you. I haven’t checked with the Azure AD team on this, so please take my findings with a grain of salt, and hope for real support documentation to arrive soon!

NOTE: This refers to the “ADSync” module that ships with Azure AD Connect 1.0.8667.0.

Cmdlet

Add-ADSyncAADServiceAccount

My
Comments

Attempts to connect to AAD to see what “Sync_…” account you’re using.

Sample
Usage


Cmdlet

Add-ADSyncAttributeFlowMapping

My
Comments

Maps a source to target
attribute.

Export one of the rules
from the editor to see this and other samples.

Sample
Usage

Add-ADSyncAttributeFlowMapping  `

-SynchronizationRule $syncRule[0] `

-Source @(‘mailNickname’,‘sAMAccountName’)
`

-Destination ‘cloudFiltered’
`

-FlowType ‘Expression’
`

-ValueMergeType ‘Update’ `

-Expression ‘IIF(IsPresent([isCriticalSystemObject])
|| IsPresent([sAMAccountName]) = False || [sAMAccountName] =
“SUPPORT_388945a0” || Left([mailNickname], 14) =
“SystemMailbox{” || Left([sAMAccountName], 4) = “AAD_” ||
(Left([mailNickname], 4) = “CAS_” && (InStr([mailNickname],
“}”) > 0)) || (Left([sAMAccountName], 4) = “CAS_”
&& (InStr([sAMAccountName], “}”) > 0)) ||
Left([sAMAccountName], 5) = “MSOL_” ||
CBool(IIF(IsPresent([msExchRecipientTypeDetails]),BitAnd([msExchRecipientTypeDetails],&H21C07000)
> 0,NULL)) ||
CBool(InStr(DNComponent(CRef([dn]),1),”\\0ACNF:”)>0), True,
NULL)’
`

-OutVariable syncRule

Cmdlet

Add-ADSyncConnector

My
Comments

Sample
Usage


Cmdlet

Add-ADSyncConnectorAnchorConstructionSettings

My
Comments

Sample
Usage


Cmdlet

Add-ADSyncConnectorAttributeInclusion

My
Comments

Sample
Usage


Cmdlet

Add-ADSyncConnectorHierarchyProvisioningMapping

My
Comments

Sample
Usage


Cmdlet

Add-ADSyncConnectorObjectInclusion

My
Comments

Sample
Usage


Cmdlet

Add-ADSyncGlobalSettingsParameter

My
Comments

Sample
Usage


Cmdlet

Add-ADSyncJoinConditionGroup

My
Comments

Used in the construction of
sync rules.

Export one of the rules
from the editor to see this and other samples.

Sample
Usage

Add-ADSyncJoinConditionGroup  `

-SynchronizationRule $syncRule[0] `

-JoinConditions @($condition0[0]) `

-OutVariable syncRule

Cmdlet

Add-ADSyncRule

My
Comments

Export one of the rules
from the editor to see this and other

samples.

Sample
Usage

Add-ADSyncRule  `

-SynchronizationRule $syncRule[0]

Cmdlet

Add-ADSyncRunProfile

My
Comments

Sample
Usage


Cmdlet

Add-ADSyncRunStep

My
Comments

Sample
Usage


Cmdlet

Add-ADSyncScopeConditionGroup

My
Comments

Used in the construction of
sync rules.

Export one of the rules
from the editor to see this and other samples.

Sample
Usage

Add-ADSyncScopeConditionGroup  `

-SynchronizationRule $syncRule[0] `

-ScopeConditions @($condition0[0],$condition1[0],$condition2[0]) `

-OutVariable syncRule

Cmdlet

Disable-ADSyncConnectorPartition

My
Comments

Sample
Usage


Cmdlet

Disable-ADSyncConnectorPartitionHierarchy

My
Comments

Sample
Usage


Cmdlet

Disable-ADSyncExportDeletionThreshold

My
Comments

 Disables the accidental deletion safety feature.More info here: https://azure.microsoft.com/en-us/documentation/articles/active-directory-aadconnectsync-feature-prevent-accidental-deletes/

Sample
Usage

 Disable-ADSyncExportDeletionThreshold

Cmdlet

Enable-ADSyncConnectorPartition

My
Comments

Sample
Usage


Cmdlet

Enable-ADSyncConnectorPartitionHierarchy

My
Comments

Sample
Usage


Cmdlet

Enable-ADSyncExportDeletionThreshold

My
Comments

 Enables the accidental deletion safety feature. To verify, run Get-MsolDirSyncConfiguration.More info here: https://azure.microsoft.com/en-us/documentation/articles/active-directory-aadconnectsync-feature-prevent-accidental-deletes/

Sample
Usage

Enable-ADSyncExportDeletionThreshold

Cmdlet

Get-ADSyncAADPasswordResetConfiguration

My
Comments

I believe this is used to
report on password write-back.

Sample
Usage

Get-ADSyncAADPasswordResetConfiguration -Connector ‘demo1923.onmicrosoft.com – AAD’


Cmdlet

Get-ADSyncAADPasswordSyncConfiguration

My
Comments

Indicates whether or not
password hash sync is enabled (SYNC)

Sample
Usage

Get-ADSyncAADPasswordSyncConfiguration -SourceConnector ‘laptop.lab’

Cmdlet

Get-ADSyncConnector

My
Comments

Gets the management agents
(connectors) used by the sync service.

Sample
Usage

Get-ADSyncConnector

Cmdlet

Get-ADSyncConnectorHierarchyProvisioningDNComponent

My
Comments

Couldn’t get it to work

Sample
Usage

x =
Get-ADSyncConnector -Name
‘laptop.lab’

Get-ADSyncConnectorHierarchyProvisioningDNComponent -ShowHidden -Connector $x

Cmdlet

Get-ADSyncConnectorHierarchyProvisioningMapping

My
Comments

Couldn’t get it to work

Sample
Usage

$x =
Get-ADSyncConnector -Name
‘laptop.lab’

Get-ADSyncConnectorHierarchyProvisioningMapping -Connector $x

Cmdlet

Get-ADSyncConnectorHierarchyProvisioningObjectClass

My
Comments

Didn’t test: I presume it
lists the objects to be synced (e.g. people, contacts, etc)

Sample
Usage


Cmdlet

Get-ADSyncConnectorParameter

My
Comments

Sample
Usage


Cmdlet

Get-ADSyncConnectorPartition

My
Comments

Sample
Usage


Cmdlet

Get-ADSyncConnectorPartitionHierarchy

My
Comments

Sample
Usage


Cmdlet

Get-ADSyncConnectorTypes

My
Comments

Sample
Usage


Cmdlet

Get-ADSyncGlobalSettings

My
Comments

Displays Global
Configuration Settings.

Sample
Usage

  (Get-ADSyncGlobalSettings).Parameters
| Where name -eq Microsoft.SynchronizationOption.AnchorAttribute

Cmdlet

Get-ADSyncGlobalSettingsParameter

My
Comments

Sample
Usage


Cmdlet

Get-ADSyncRule

My
Comments

 Lists the sync rules

Sample
Usage


Cmdlet

Get-ADSyncRunProfile

My
Comments

Sample
Usage


Cmdlet

Get-ADSyncSchema

My
Comments

Sample
Usage


Cmdlet

Get-ADSyncServerConfiguration

My
Comments

Sample
Usage


Cmdlet

New-ADSyncConnector

My
Comments

Sample
Usage


Cmdlet

New-ADSyncJoinCondition

My
Comments

Sample
Usage


Cmdlet

New-ADSyncRule

My
Comments

Export one of the rules
from the editor to see this and other samples.

Sample
Usage

New-ADSyncRule  `

-Name ‘In from
AD – User Join’
`

-Identifier ‘c2db05cb-39bd-4e17-a19a-26718c692e48’
`

-Description
`

-Direction ‘Inbound’
`

-Precedence 100
`

-PrecedenceAfter ‘00000000-0000-0000-0000-000000000000’ `

-PrecedenceBefore ‘00000000-0000-0000-0000-000000000000’ `

-SourceObjectType ‘user’ `

-TargetObjectType ‘person’ `

-Connector ‘43617e64-d544-4426-9354-e7d7508915b1’
`

-LinkType ‘Provision’
`

-SoftDeleteExpiryInterval 0 `

-ImmutableTag ‘Microsoft.InfromADUserJoin.003’ `

-OutVariable syncRule

Cmdlet

New-ADSyncRunProfile

My
Comments

Sample
Usage


Cmdlet

New-ADSyncScopeCondition

My
Comments

Sample
Usage


Cmdlet

Remove-ADSyncAADPasswordResetConfiguration

My
Comments

Sample
Usage


Cmdlet

Remove-ADSyncAADPasswordSyncConfiguration

My
Comments

Sample
Usage


Cmdlet

Remove-ADSyncAADServiceAccount

My
Comments

Sample
Usage


Cmdlet

Remove-ADSyncAttributeFlowMapping

My
Comments

Sample
Usage


Cmdlet

Remove-ADSyncConnector

My
Comments

 Removes one of your Management Agents (Connectors)

Sample
Usage


Cmdlet

Remove-ADSyncConnectorAnchorConstructionSettings

My
Comments

Sample
Usage


Cmdlet

Remove-ADSyncConnectorAttributeInclusion

My
Comments

Sample
Usage


Cmdlet

Remove-ADSyncConnectorHierarchyProvisioningMapping

My
Comments

Sample
Usage


Cmdlet

Remove-ADSyncConnectorObjectInclusion

My
Comments

Sample
Usage


Cmdlet

Remove-ADSyncGlobalSettingsParameter

My
Comments

Sample
Usage


Cmdlet

Remove-ADSyncJoinConditionGroup

My
Comments

Sample
Usage


Cmdlet

Remove-ADSyncRule

My
Comments

 Removes a sync rule.

Sample
Usage


Cmdlet

Remove-ADSyncRunProfile

My
Comments

Sample
Usage


Cmdlet

Remove-ADSyncRunStep

My
Comments

Sample
Usage


Cmdlet

Remove-ADSyncScopeConditionGroup

My
Comments

Sample
Usage


Cmdlet

Search-ADSyncDirectoryObjects

My
Comments

Sample
Usage


Cmdlet

Set-ADSyncAADCompanyFeature

My
Comments

Sample
Usage


Cmdlet

Set-ADSyncAADPasswordResetConfiguration

My
Comments

Sample
Usage


Cmdlet

Set-ADSyncAADPasswordSyncConfiguration

My
Comments

 See details here:  http://blogs.technet.com/b/undocumentedfeatures/archive/2015/11/18/reset-aadsync-or-aadconnect-password-hash-sync-configuration.aspx

Sample
Usage

Set-ADSyncAADPasswordSyncConfiguration -SourceConnector $adConnector -TargetConnector $aadConnector -Enable $false

Cmdlet

Set-ADSyncAADPasswordSyncState

My
Comments

Sample
Usage


Cmdlet

Set-ADSyncConnectorParameter

My
Comments

Sample
Usage


Cmdlet

Set-ADSyncGlobalSettings

My
Comments

Sample
Usage


Cmdlet

Set-ADSyncSchema

My
Comments

Sample
Usage


Cmdlet

Set-ADSyncServerConfiguration

My
Comments

Sample
Usage


Cmdlet

Set-MIISADMAConfiguration

My
Comments

Sample
Usage


Cmdlet

Test-AdSyncUserHasPermissions

My
Comments

Sample
Usage


Cmdlet

Update-ADSyncConnectorPartition

My
Comments

Sample
Usage


Cmdlet

Update-ADSyncConnectorSchema

My
Comments

Sample
Usage


Cmdlet

Update-ADSyncDRSCertificates

My
Comments

Sample
Usage


I’m Speaking @ IT/Dev Connections – UPDATED!

ImSpeakingAtDevConnections

I am 34,000 feet in the air at the moment, headed to the IT / Dev Connections conference in Las Vegas, Nevada! Judging by the list of sessions and speakers, I expect this to be a great event. I am also very interested to see how many of you all are in attendance, especially since Microsoft has killed so many of their conferences (MEC, MMS, etc).

I have once again been given an opportunity to present at this seminar, so I invite you to attend both of my sessions:

 Tuesday @ 1:45 in Pinyon 2 – Exchange Online Protection In-Depth

 Wednesday @ 1:15 in Pinyon 2 – Mastering PowerShell for Exchange Online

This blog post will also serve as the means to download my PowerPoint presentations as well as the PowerShell samples, so check back after my sessions are over for those.

UPDATE:

Thanks for everyone who attended my sessions! Here are the resources as promised:

A New and an Updated PowerShell Script

NOTE: Updated November 2016 to include -ServersToQuery and -StartTime and parameters.

e.g.

.\RDPConnectionParser.ps1 -ServersToQuery Server1, Server2 -StartTime "November 1"

————————–

Hey everyone, yes I’m still alive!

Connection Report for Remote Desktop 

I wrote a script that connects to one or multiple servers and captures Remote Desktop logons, disconnects, reconnects and logoffs along with the connecting IP:

Untitled

Feb 2021 Edit:
Microsoft finally took down the TechNet Gallery. This script is now available on GitHub: https://github.com/Mike-Crowley/Public-Scripts/blob/main/RDPConnectionParser.ps1

Download RDPConnectionParser.ps1 here

Recipient Address Report (Formally ProxyAddressCount)

I also updated the “Exchange Proxy Address (alias) Report” script.  It now includes a few environment metrics, as well as the regular CSV-style output:

Untitled(1)

Untitled2

Download the updated script here

Feb 2021 Edit:
Microsoft finally took down the TechNet Gallery. This script is now available on GitHub: https://github.com/Mike-Crowley/Public-Scripts/blob/main/RecipientReportv5.ps1

What are the Azure DirSync Cmdlets [Updated]?

ARTICLE UPDATED August 2014 to address the PowerShellConfig module.

NOTE: If you are using Azure AD Connect, see this new article.

As you may have seen, DirSync’s PowerShell functionality can now be called from the “Import-Module” cmdlet instead of running a custom DirSyncConfigShell.psc1 file. If we look at this new module, we can see 92 DirSync-related cmdlets:

DirSync PowerShell Module

Notice the screenshot is actually listing the commands of the “Microsoft.Online.Coexistence.PS.Config module” and “PowerShellConfig” (very descriptive!), not “DirSync”. That is because the DirSync module is a wrapper of sorts, calling “%programfiles% \Windows Azure Active Directory Sync\dirsync\DirSync.psd1” on your behalf. The DirSync module itself contains no cmdlets.

So, what do these cmdlets do anyway? Not all of them are well documented online, so you should start with the help file. Unfortunatley, even the help file omits a synopsis for the 67 “PowerShellConfig” cmdlets.  For the 25 within Microsoft.Online.Coexistence.PS.Config module, run the below command to generate an output similar to the following table:

ipmo DirSync
gcm -m Microsoft.Online.Coexistence.PS.Config | get-help | select name, synopsis | epcsv $env:userprofile\desktop\DirSyncCmdlets.csv -notype


Name

Synopsis

Disable-DirSyncLog

This commandlet is used to disable logging for the Azure Active Directory Sync tool.

Disable-MSOnlineObjectManagement Disable-MSOnlineObjectManagement -Credential <pscredential> [-ObjectTypes <string[]>] [-WhatIf] [-Confirm] [<CommonParameters>]
Disable-MSOnlinePasswordSync Disable-MSOnlinePasswordSync -Credential <pscredential> [-WhatIf] [-Confirm] [<CommonParameters>]
Disable-MSOnlineRichCoexistence Disable-MSOnlineRichCoexistence -Credential <pscredential> [-WhatIf] [-Confirm] [<CommonParameters>]
Disable-OnlinePasswordWriteBack

This commandlet is used to disable writing back user password resets from cloud to onpremise Active Directory.

Disable-PasswordSyncLog

This commandlet is used to disable logging for the Password Sync feature of the Azure Active Directory Sync tool.

Enable-DirSyncLog

This commandlet is used to configure the logging level for the Azure Active Directory Sync tool.

Enable-MSOnlineObjectManagement Enable-MSOnlineObjectManagement -ObjectTypes <string[]> -TargetCredentials <pscredential> -Credential <pscredential> [-WhatIf] [-Confirm] [<CommonParameters>]
Enable-MSOnlinePasswordSync Enable-MSOnlinePasswordSync -Credential <pscredential> [-WhatIf] [-Confirm] [<CommonParameters>]
Enable-MSOnlineRichCoexistence Enable-MSOnlineRichCoexistence -Credential <pscredential> [-WhatIf] [-Confirm] [<CommonParameters>]
Enable-OnlinePasswordWriteBack

This commandlet is used to enable writing back user password resets from cloud to onpremise Active Directory.

Enable-PasswordSyncLog

This commandlet is used to configure the logging level for the Password Sync feature of the Azure Active Directory Sync tool.

Get-CoexistenceConfiguration

Gets a configuration information from the Microsoft Online Coexistence Web Server

Get-DirSyncConfiguration Get-DirSyncConfiguration -TargetCredentials <pscredential> [<CommonParameters>]
Get-DirSyncLogStatus

This commandlet is used to retrieve the current logging level for the Azure Active Directory Sync tool.

Get-OnlinePasswordWriteBackStatus

This commandlet is used to obtain the current status of writing back user password resets from cloud to onpremise Active Directory.

Get-PasswordSyncLogStatus

This commandlet is used to retrieve the current logging level for the Password Sync feature of the Azure Active Directory Sync tool.

Get-PreventAccidentalDeletes

This commandlet is used to retrieve the current status of the object deletion threshold for DirSync.

Set-CoexistenceConfiguration

Configures Microsoft Online Directory Synchronization Tool.

Set-CompanyDirSyncFeatures Set-CompanyDirSyncFeatures -TargetCredentials <pscredential> -FeaturesFlag <int> [<CommonParameters>]
Set-DirSyncConfiguration Set-DirSyncConfiguration -TargetCredentials <pscredential> -DirSyncConfiguration <CloudDirSyncConfiguration> [<CommonParameters>]
Set-FullPasswordSync

Resets the password sync state information forcing a full sync the next time the service is restarted.

Set-PreventAccidentalDeletes

This commandlet is used to enable or disable the object deletion threshold for DirSync.

Start-OnlineCoexistenceSync

Starts synchronization with Microsoft Online

Update-MSOLDirSyncNetworkProxySetting

Updates the directory sync service to use the current user’s http proxy settings.

The de-“magicification” of DirSync is definitely a good thing for all Azure customers.  Having said this, I’d still keep the Codeplex FIM modules around, since they do offer a lot more control of and visibility into the underlying FIM Sync Service.

Here are the cmdlets without help documentation:

 Add-AttributeFlowMapping
 Add-ConfigurationParameter
 Add-ConnectorAnchorConstructionSettings
 Add-ConnectorAttributeInclusion
 Add-ConnectorFilter
 Add-ConnectorHierarchyProvisioningMapping
 Add-ConnectorObjectInclusion
 Add-RelationshipConditionGrouping
 Add-RunStep
 Add-SynchronizationConditionGrouping
 Disable-ConnectorPartition
 Disable-ConnectorPartitionHierarchy
 Enable-ConnectorPartition
 Enable-ConnectorPartitionHierarchy
 Export-ServerConfiguration
 Get-AADConnectorPasswordResetConfiguration
 Get-ConfigurationParameter
 Get-Connector
 Get-ConnectorHierarchyProvisioningDNComponent
 Get-ConnectorHierarchyProvisioningMapping
 Get-ConnectorHierarchyProvisioningObjectClass
 Get-ConnectorPartition
 Get-ConnectorPartitionHierarchy
 Get-ConnectorTypes
 Get-GlobalSettings
 Get-PasswordHashSyncConfiguration
 Get-RunProfile
 Get-Schema
 Get-SynchronizationRule
 Import-MIISServerConfig
 Import-ServerConfiguration
 Initialize-Connector
 Initialize-RunProfile
 Initialize-SynchronizationRule
 New-Connector
 New-RunProfile
 New-SynchronizationRule
 Remove-AADConnectorPasswordResetConfiguration
 Remove-AttributeFlowMapping
 Remove-ConfigurationParameter
 Remove-Connector
 Remove-ConnectorAnchorConstructionSettings
 Remove-ConnectorAttributeInclusion
 Remove-ConnectorFilter
 Remove-ConnectorHierarchyProvisioningMapping
 Remove-ConnectorObjectInclusion
 Remove-PasswordHashSyncConfiguration
 Remove-RelationshipConditionGrouping
 Remove-RunProfile
 Remove-RunStep
 Remove-SynchronizationConditionGrouping
 Remove-SynchronizationRule
 Set-AADConnectorPasswordResetConfiguration
 Set-ConfigurationParameter
 Set-Connector
 Set-GlobalSettings
 Set-MIISADMAConfiguration
 Set-MIISECMA2Configuration
 Set-MIISExtMAConfiguration
 Set-MIISFIMMAConfiguration
 Set-PasswordHashSyncConfiguration
 Set-ProvisioningRulesExtension
 Set-RunProfile
 Set-Schema
 Set-SynchronizationRule
 Update-ConnectorPartition
 Update-ConnectorSchema

As time allows, I will return with more detail on each of the above DirSync cmdlets; so long for now!

DirSync 1.0.6593.0012

Late Monday, Microsoft released another update to the DirSync software, this time with a build number of 6593.0012. You can download it in from the usual link.

DirSync 1.0.6593.0012

As with previous DirSync updates, there has been no official announcement of the release, however the “use at your own risk” Wiki does mention one of the new features:

Version 6593.0012
Date Released 2/3/2014
Notable Changes

New features:

  • Additional Attributes are synchronized on User and Contact objects

Attributes documented here

The new attributes referenced in the link are userCertificate and userSMIMECertificate. Interestingly pwdLastSet was also added, however there is no mention of that one in the article. These additions serve an unknown purpose for now, however one might speculate that they are in support of new capabilities soon to be available in the service?!

Before you upgrade, you may wish to get a “before and after” review of the attribute inclusion list. The best way to review this is in the “Configure Attribute Flow” area of each management agent. At the end of this post, I have also shared an experimental PowerShell method of getting this information.

It is noteworthy that the author of this update, a Microsoft Program Manager for DirSync, is linking to yet another community wiki page instead of the seemingly defunct Knowledge Base article KB-2256198. Sadly, it would appear that the crumbling integrity of the TechNet/Support documentation may be latest casualty in a growing list of IT Pro-related cuts Microsoft has made along their quest to the cloud…

<#
Description:
This script counts and dumps the attribute inclusion lists from each MA.
It does not evaluate attribute flow or applicable object types.

February 3 2014
Mike Crowley
http://mikecrowley.us
#>

#Import Modules
Import-Module SQLps -WarningAction SilentlyContinue

#Get SQL Info
$SQLServer = (gp 'HKLM:SYSTEM\CurrentControlSet\services\FIMSynchronizationService\Parameters').Server
if ($SQLServer.Length -eq '0') {$SQLServer = $env:computername}
$SQLInstance = (gp 'HKLM:SYSTEM\CurrentControlSet\services\FIMSynchronizationService\Parameters').SQLInstance
$MSOLInstance = ($SQLServer + "\" + $SQLInstance)

#Get Management Agent Attribute Info
[xml]$OnPremAttributes = (Invoke-Sqlcmd -MaxCharLength 10000 -ServerInstance $MSOLInstance -Query "SELECT attribute_inclusion_xml FROM [FIMSynchronizationService].[dbo].[mms_management_agent] WHERE [ma_name] = 'Active Directory Connector'").attribute_inclusion_xml
[xml]$CloudAttributes = (Invoke-Sqlcmd -MaxCharLength 10000 -ServerInstance $MSOLInstance -Query "SELECT attribute_inclusion_xml FROM [FIMSynchronizationService].[dbo].[mms_management_agent] WHERE [ma_name] = 'Windows Azure Active Directory Connector'").attribute_inclusion_xml
$ADAttributes = $OnPremAttributes.'attribute-inclusion'.attribute
$AzureAttributes = $CloudAttributes.'attribute-inclusion'.attribute

#Output to Screen
Write-Host $ADAttributes.count "Attributes synced from AD to the Metaverse" -F Cyan
Write-Host $AzureAttributes.count "Attributes synced from the Metaverse to Azure" -F Cyan
Write-Host "See" $env:TEMP\DirSyncAttributeList.txt "for detail" -F Cyan

#Output to File
"******AD Attributes******" | Out-File $env:TEMP\DirSyncAttributeList.txt
$ADAttributes | Out-File $env:TEMP\DirSyncAttributeList.txt -Append
" "| Out-File $env:TEMP\DirSyncAttributeList.txt -Append
"******Azure Attributes******" | Out-File $env:TEMP\DirSyncAttributeList.txt -Append
$AzureAttributes | Out-File $env:TEMP\DirSyncAttributeList.txt -Append

##END

Dirsync: Determine if Password Sync is Enabled

For those not interested in the complete DirSync Report I published last week, now you can run just the Password Hash Sync portion, in a script I published here: Dirsync: Determine if Password Sync is Enabled.

For deployments with remote SQL installations: As with the previous report, note that we make use of the SQL PowerShell Module, which must be present on the computer.

Sample Output(s)

DirSync “Busted Users” Report

If you administer DirSync for your organization, you likely have seen emails like this, indicating some of your users didn’t sync.

DirSync Error Email

It can be a frustrating email, since the “error description” is for some reason blank and the “On-premises object ID” column is not something that’s easy to correlate to a user account within your Active Directory. There are also application event log entries (FIMSynchronizationService #6111 and Directory Synchronization #0), but again these aren’t exactly rich with detail.

Many of you know that DirSync is actually a customized installation FIM 2010 R2’s Synchronization Service. Within the miisclient.exe console, you can look at your most recent “Export” job and examine the errors one at a time.

Miisclient.exe Console


(By the way, this is actually the place to go if you wanted to configure filtering for directory synchronization.)

Using this console certainly works, but it’s not an efficient way to resolve errors. Microsoft seems to acknowledge this, but falls short of a fix with that email, in my opinion. Instead of wearing out your mouse, I propose you use the PowerShell script I have written below. Within, I leverage the free FimSyncPowerShellModule which you’ll need to download and copy to:

…\System32\WindowsPowerShell\v1.0\Modules\FimSyncPowerShellModule\FimSyncPowerShellModule.psm1

Once you’ve copied the module, you’re ready to run the report, which can be downloaded here.

Here is a sample output, followed by the code itself.

Sample Output

<#
Description:
This script generates a list of users who are failing to export to Azure AD.

This script makes use of the FimSyncPowerShellModule
https://fimpowershellmodule.codeplex.com/
(Download and copy to C:\Windows\System32\WindowsPowerShell\v1.0\Modules\FimSyncPowerShellModule\FimSyncPowerShellModule.psm1)

October 18 2013
Mike Crowley
http://mikecrowley.us
#>

#Import the FimSyncPowerShellModule Module
ipmo FimSyncPowerShellModule

#Get the last export run
$LastExportRun = (Get-MIIS_RunHistory -MaName 'Windows Azure Active Directory Connector' -RunProfile 'Export')[0]

#Get error objects from last export run (user errors only)
$UserErrorObjects = $LastExportRun | Get-RunHistoryDetailErrors | ? {$_.dn -ne $null}

$ErrorFile = @()

#Build the custom Output Object
$UserErrorObjects | % {
 $TmpCSObject = Get-MIIS_CSObject -ManagementAgent 'Windows Azure Active Directory Connector' -DN $_.DN
 [xml]$UserXML = $TmpCSObject.UnappliedExportHologram
 $MyObject = New-Object PSObject -Property @{
 EmailAddress = (Select-Xml -Xml $UserXML -XPath "/entry/attr" | select -expand node | ? {$_.name -eq 'mail'}).value
 UPN = (Select-Xml -Xml $UserXML -XPath "/entry/attr" | select -expand node | ? {$_.name -eq 'userPrincipalName'}).value
 ErrorType = $_.ErrorType
 DN = $_.DN
 }
 $ErrorFile += $MyObject
 }

$FileName = "$env:TMP\ErrorList-{0:yyyyMMdd-HHmm}" -f (Get-Date) + ".CSV"
$ErrorFile | select UPN, EmailAddress, ErrorType, DN | epcsv $FileName -NoType

#Output to the screen
$ErrorFile | select UPN, EmailAddress, ErrorType, DN

Write-Host
Write-Host $ErrorFile.count "users with errors. See here for a list:" -F Yellow
Write-Host $FileName -F Yellow
Write-Host